Kids Party Crafts
Making Pretty Cards and Things!
Got an excuse to celebration? Then get
creative with kids party crafts and throw a party. Don`t you admit though that buying everything from the supermarket
is so boring and expensive. All that money you could save can be spent on
gifts, cakes and pop. Yummy!
|
The following projects are easy and fun, plus you can ask some of your friends to help in exchange for an invite to the party. Make Party Invitations |
 |
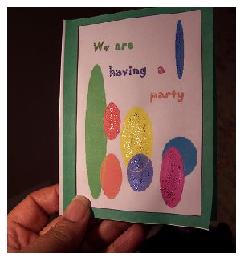
Iain and James used Windows Paint to design their card which is simple and ideal because they are learning how to use it in school. In a joint effort they came up with the design on the above.
Start with a frame if you like. We found it helped when designing the layout for the front and inside of the card. Click on the line tool to choose the width and then the rectangle shaped tool. Now choose the color. Draw it quite large so that when you scale your design down it will be sharp.
Using colors is important for kids party crafts and in Paint`s color palette you can create so many. You have some nice shapes to play with too. Iain and James gave their design a balloon theme using the oval shaped tool and lots of color. You can also choose to paste some clip art from files on your computer or a cd. To do that choose the select tool and widen the box big enough to accommodate the clip art. Right click inside the box and choose `paste from` which will prompt you to find your file. Once your picture appears in the box do not click outside it until your happy with the size and orientation. You can rotate or increase/decrease the size using the right click again, and also move your image around using left click and hold. When you are satisfied, click the outside of the box and the image will stay.
The boys used a funky kind of font which is hard to see in the picture. Try it yourself! If you click on the `A` tool it opens the text box, the fonts menu also opens in the top left corner. Scroll down and choose `Jokerman`, select the size, and change the color to make it fun script. When you have finished writing your headline, name your file and close it.
If you used a frame for your card, copy the 1st file and open it. Your design will be in the copy but you only want the frame, so use the eraser tool and erase all the artwork inside the frame.
Choose the `A` tool, change the font to another if you want, then write your invite with large enough letters and don`t forget the date, time, and place. When your happy with it, save your work and rename your file. You can now print both sides of your card. Setting up the print layout can be a bit tricky so ask someone who knows how to do that for assistance.
Once printed you can dress up the card with glitter or stickers.
 |
Party Hats |
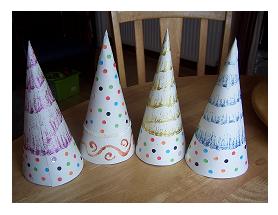
Here is how we made them. I have a roll of wallpaper lining which I love to use with the boys for collages and other crafts. It is just the right stiffness for the paper hats but it`s plain and white so we had to be creative with the decoration.
You need to draw a large circle and cut it into quarters like a pie. I used a large pot lid as a template and added a few inches to the circumference. The next step is to take a quarter circle and paste one side along its edge and stick the two sides together to make a cone shape. It dries pretty quick if you use PVA glue. Now dig deep into your craft box and see what you can find to jazz them up. I used a string of sequins, glitter glue, and some polka dots.
Where did they come from? Here is a trick you can use if you have a hole punch. Using different colored paper triple fold them and punch holes lots of holes. I have a container on my hole punch that catches the little discs. They only hold so much so you need to empty them into a dish. That`s how you make the polka dots which you then stick on. To do this mega quick, dab glue spots all over the area, lick the end of your finger to pick the dots up and stick them onto the glue spots. Simple!
With glitter glue you can go crazy and get some amazing designs like I have done in the picture. When they are dry, staple very thin elastic for the strap on each side and pop some streamers on the top if you like.
|
How to Make a classic Paper Crown |
 |
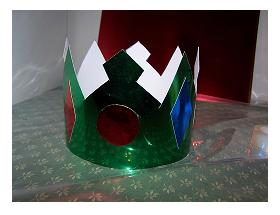
What you do is get A4 colored paper or card like ours and half it lengthwise. Either you can make it a ring crown or you can put some spears and peaks on it like ours which you will need to draw out. Once you have drawn an outline on just one of the sides, put the two sides together and cut the shape out.
Get some clear sticky tape and overlapping the ends, stick the sides together to form the crown. Put some tape on the inside too to secure it.
What makes a paper crown a dazzling paper crown? It needs some jewels! If you are making several hats from metallic card, use the scraps from other colors to cut out diamonds and circles for the jewels. Sticking them on can be tricky though.
I initially used PVA glue but found the jewel shapes tended to curl outwards. So I let it dry for a few minutes and pressed down from the inside on each shape and it eventually stuck, but they came off a few days later. Try using glue spots or plain old sticky tape.
If you are using paper, no problem. You will have no problem sticking things on like stars and glitter, or you can use felt tips to draw some eye-catching designs. Sequins are perfect for making the jewels. Bunch same colors together into circles and diamonds.
Other Projects For Kids Party Crafts
If we have time before the party we will make some paper chains and post a pic of them here. They were my very first decoration project in school and that`s going back a few years. You can buy the sticky paper already cut from craft shops, or cut strips from colored paper and link and stick each ring with a small piece of clear sticky tape.
How about making bunting? It`s a pretty decoration. To learn how to make it you can skip over to my bunting page in the paper crafts section.
...or back to Home Page.